
Python and Visual Studio Code
Setting Up a Professional Python Development Environment for Medical Imaging
Difficulty: Beginner
Reading Time: 15–20 minutes
Prerequisites:
- Python installed (see previous lesson)
- Basic computer skills
Learning Objectives
After completing this tutorial, you will be able to:
- Understand why Visual Studio Code (VS Code) is an excellent editor for Python.
- Install Visual Studio Code.
- Install the official Python extension.
- Configure VS Code for Python development.
- Create and run Python programs.
- Use the integrated terminal.
- Debug Python code.
- Prepare your computer for future Medical Imaging and AI tutorials.
Introduction
Python has become the standard programming language for medical imaging, data science, and artificial intelligence. While Python can be written in many different editors, choosing the right development environment makes programming easier, more productive, and less error prone.
Visual Studio Code (VS Code) is one of the world’s most popular code editors because it combines simplicity with powerful development tools. It is free, cross-platform, and supports thousands of extensions that make it ideal for scientific programming.
Throughout PyMedLab, all tutorials and projects will be developed using VS Code.
Why Use VS Code?
Visual Studio Code provides many features that improve your programming experience.
Advantages
- Free and open source
- Lightweight and fast
- Excellent Python support
- Integrated Terminal
- Intelligent code completion (IntelliSense)
- Built-in debugger
- Git integration
- Jupyter Notebook support
- Thousands of extensions
Why Medical Physicists Use VS Code
Medical imaging projects often involve:
- Python scripts
- Jupyter notebooks
- DICOM datasets
- AI models
- Git repositories
- Large datasets
VS Code provides a single environment where you can manage all of these resources efficiently.
VS Code in the Medical Imaging Workflow

Downloading VS Code
Visit the official website:
Download the version for your operating system:
- Windows
- macOS
- Linux
Installing VS Code
Run the installer.
During installation, enable the following options:
✔ Add to PATH
✔ Register Code as an editor
✔ Add “Open with Code”
These options simplify opening projects from Windows Explorer.
First Launch
After installation, VS Code looks like this:
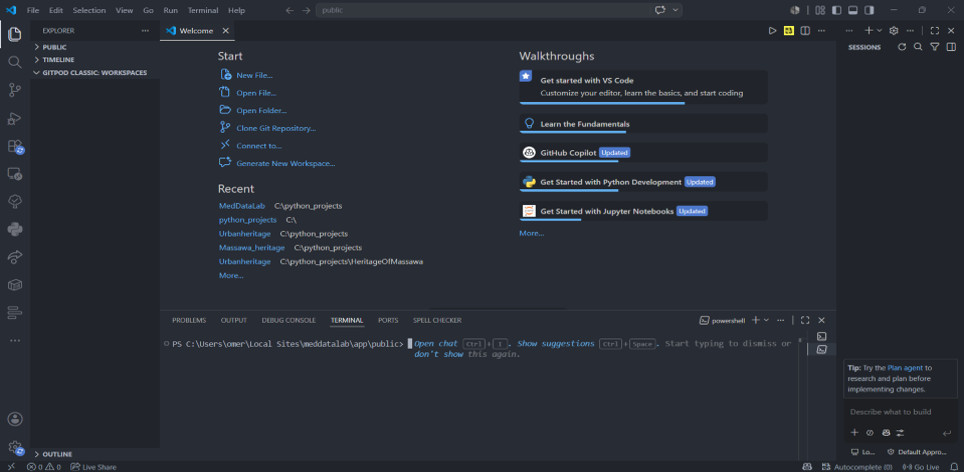
Installing the Python Extension
Open the Extensions panel.
Search for:
Python
Install the extension published by Microsoft.
This extension provides:
- Syntax highlighting
- IntelliSense
- Code formatting
- Debugging
- Jupyter support
Selecting the Python Interpreter
Press
Ctrl + Shift + P
Type
Python: Select Interpreter
Choose the latest Python installation.
Example:
Python 3.14
Creating Your First Project
Create a folder named
MedicalImagingProjects
Inside it create
hello.py
Writing Your First Program
print("Welcome to PyMedLab!")

print ("Python is ready.")

print ("Let's analyze medical images!")
Run
Run → Run Without Debugging
Output
Welcome to PyMedLab!

Python is ready.

Let's analyze medical images!
Using the Integrated Terminal
One of the best VS Code features is the built-in terminal.
Open
Terminal
↓
New Terminal
You can now run Python directly.
python hello.py
Installing Python Packages
Later tutorials require additional libraries.
Install them directly inside VS Code.
Example
pip install numpyor
pip install pydicomInstalling Useful Extensions
For PyMedLab I recommend the following:
| Extension | Purpose |
| Python | Python support |
| Pylance | Faster IntelliSense |
| Jupyter | Notebook support |
| GitLens | Git integration |
| Black Formatter | Automatic code formatting |
| Markdown All in One | Writing tutorials |
| Code Spell Checker | Documentation |
Example Project Structure
MedicalImagingProjects/
│── hello.py
│──dicom/
– CT001.dcm
-CT002.dcm
│── notebooks/
│Introduction. Ipynb
│── images/
└── README.md
Keeping your projects organized from the beginning will make it easier to manage code, data, and documentation.
Common Beginner Mistakes
Python interpreter not selected
Symptoms
Import "numpy" could not be resolvedSolution
Select the correct Python interpreter.
Extension not installed
Symptoms
No syntax highlighting.
No Run button.
Solution
Install Microsoft’s Python extension.
Wrong folder opened
Always open the project folder rather than individual files to ensure relative paths work correctly.
Forgetting to save files
Press
Ctrl + Sbefore running your code.
Best Practices
✔ Create one folder for each project.
✔ Use descriptive file names.
✔ Keep code organized into folders.
✔ Install only the packages you need.
✔ Update VS Code regularly.
✔ Learn keyboard shortcuts to improve productivity.
Exercises
Exercise 1
Create a folder called:
PythonBasics
Exercise 2
Create
first_program.py
Print your name.
Exercise 3
Create variables for:
- Patient name
- CT scanner model
- Slice thickness
Print the values.
Exercise 4
Install NumPy using pip.
Verify the installation with:
import numpy as np
print(np. __version__)
Summary
In this tutorial, you learned how to:
- Install Visual Studio Code
- Configure Python support
- Create your first project
- Run Python scripts
- Use the integrated terminal
- Install Python packages
- Prepare your development environment for future tutorials
What’s Next?
In the next lesson, Installing Anaconda, you’ll learn how Anaconda simplifies package management and provides a complete scientific computing environment for Python. You’ll also understand when to use Anaconda versus a standard Python installation.
References:
Microsoft VS Code Documentation
Python Extension Documentation
Leave a Reply