
Lesson 1: Getting Started with Python
Category: Python → Python Basics
Difficulty: Beginner
Estimated Reading Time: 8 minutes
Prerequisites: None
Learning Objectives
By the end of this lesson, you will be able to:
- Understand what Python is and why it is widely used.
- Install Python on your computer.
- Launch the Python IDLE environment.
- Write and execute your first Python commands.
- Understand the difference between the Python Shell and Python scripts.
Introduction
Python is one of the world’s most popular programming languages because it is easy to learn, readable, and extremely powerful. It is widely used in scientific computing, artificial intelligence, machine learning, data science, and medical imaging.
For medical physicists, radiologists, and imaging researchers, Python has become the standard programming language for analyzing DICOM images, processing CT and MRI scans, building AI models, and automating clinical workflows.
In this lesson, you’ll install Python and become familiar with the Python Interactive Development and Learning Environment (IDLE), which is an excellent tool for beginners.
Why Learn Python for Medical Imaging?
Python is used in many medical imaging applications, including:
- Reading DICOM images
- Image processing
- Radiomics
- Machine learning
- Deep learning
- AI-assisted diagnosis
- Medical image visualization
Throughout PyMedLab, every tutorial will build upon the skills introduced here.
Step 1 – Installing Python
Visit the official Python website:
Download the latest stable version of Python for your operating system.
During installation on Windows, make sure you check:
☑ Add Python to PATH
before clicking Install Now.
After installation, verify that Python is available by opening the Command Prompt and typing:
python –version
Example output:
Python 3.14.0
Step 2 – Starting IDLE
Python comes with a beginner-friendly programming environment called IDLE.
IDLE stands for:
Integrated Development and Learning Environment
To open IDLE on Windows:
- Open the Start Menu.
- Search for IDLE.
- Click IDLE (Python 3.x).
When IDLE starts, you’ll see the Python Shell.
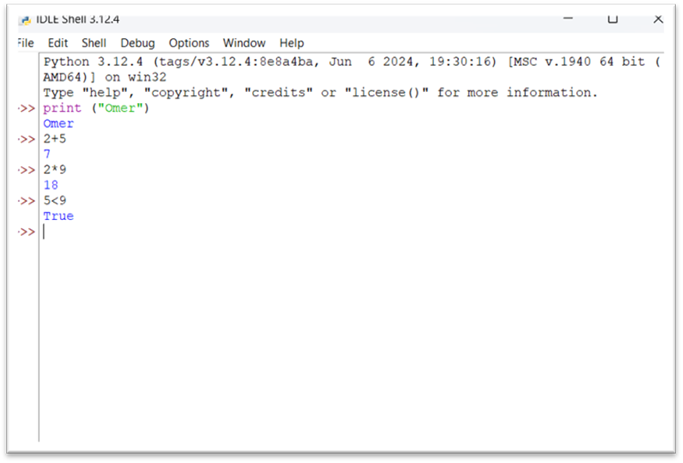
Understanding the Python Shell
The Python Shell is an interactive environment where you can type Python commands and immediately see the results.
For example:
2 + 3
Output:
5
Another example:
Print (“Welcome to PyMedLab!”)
Output:
Welcome to PyMedLab!
The Shell is useful for experimenting with small pieces of code before writing complete programs.
Writing Your First Program
Let’s write a simple program.
In IDLE, click:
File
↓
New File
Type the following code:
Print (“Hello, PyMedLab!”)
Save the file as:
hello.py
Run it by selecting:
Run
↓
Run Module
Output:
Hello, PyMedLab!
Congratulations! You’ve written your first Python program.
Clinical Insight
Although “Hello World” is a simple example, the same workflow is used to develop software for medical imaging.
Soon you’ll write programs that:
- Read CT images
- Display MRI slices
- Process DICOM files
- Build AI models
- Analyze radiomics features
Every advanced application begins with these fundamental steps.
Common Mistakes
New Python users often encounter a few common issues during installation and when running their first programs. Being aware of these mistakes can save you time and frustration.
- Forgetting to check “Add Python to PATH” during installation on Windows. If this option is not selected, you may not be able to run Python from the Command Prompt.
- Typing Python commands in the Command Prompt instead of the Python Shell. Remember that commands such as print(“Hello”) should be entered in the Python Shell or in a Python script, not directly in the operating system’s command prompt.
- Saving Python files without the .py extension. Python recognizes program files by their (.py) extension (for example, hello.py).
- Forgetting to save your script before running it. Always save your work before selecting Run → Run Module (F5) in IDLE to ensure that the latest version of your code is executed.
- Saving scripts in different folders. As a beginner, it is good practice to create a dedicated project folder for each lesson or project and save all related Python scripts, data files, and images in that folder. Keeping everything organized makes it easier to find your files and avoids problems with missing data or incorrect file paths.
- Best Practice
For example, if you’re following the PyMedLab tutorials, you could organize your files like this:
Python/
│── Lesson01_Getting_Started/
│ hello.py
│ exercise1.py
│── Lesson02_Variables/
│ variables.py
│── Lesson03_NumPy/
│ numpy_arrays.py
│── Lesson04_DICOM/
read_dicom.py
CT_Image.dcm
As you progress to medical imaging, you can keep each lesson self-contained. For example, a DICOM lesson might look like:
Load_DICOM_Images/
│── load_dicom.py
│── notebook. ipynb
│── CT_Image.dcm
│── output.png
│── README.md
This organization makes your projects easier to manage, share, and upload to GitHub.
Exercises
- Install Python on your computer.
- Open IDLE.
- Calculate:
25 + 37
- Print your name.
Print (“Your Name”)
- Create a file called:
first_program.py
and print your favorite programming language.
Summary
In this lesson, you learned how to:
- Install Python
- Open IDLE
- Use the Python Shell
- Create your first Python script
- Run a Python program
These skills provide the foundation for all future lessons in PyMedLab.
Next Lesson
Leave a Reply